Tuesday, September 29, 2009

Rule Of Thirds

You have learned that to expose an image properly, you need to know/learn about ISO speed, shutter speed, and the aperture. As you master exposure and compare your shots with those of professionals or even seasoned hobbyists, you soon find out that there is something to their shots that make it look more dramatic. What is that?

The answer is in their composition. There is much that you, we, have to learn about composition. But there's one very important rule; "The Rule Of Thirds". This is not really a "rule" per se but rather a guideline.

So what is the rule of thirds? When you look at your viewfinder, or LCD, imagine that there are 2 vertical lines and 2 horizontal lines that are dividing your view into 3 equal parts. And where the lines meet, is where you need to put the focal point or your subject. It's that simple. Take a look at the image below for an illustration of exactly what I mean.


And that's simply it. When shooting your subject, don't just put your subject dead-center. By doing that, you will only be taking an ordinary snapshot. Instead, position your subject so that it's most important part is positioned on where those lines intersect and you'll soon notice that your images become more dramatic.

Let's look at the image below for example:


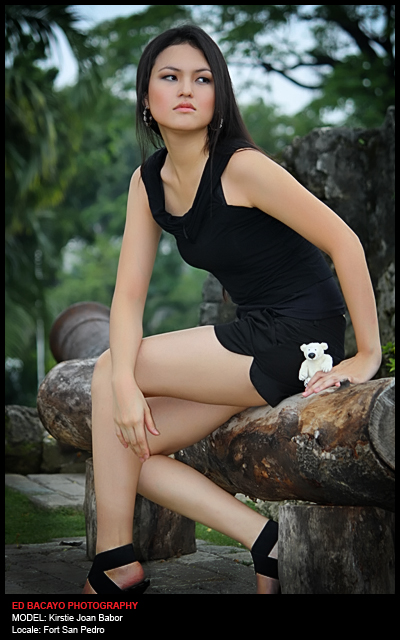
In this image, I carefully placed our model's (Kirstie Babor) body on the 3rd portion of the image (the 2nd vertical line from the left). Also, I placed her head or face on the upper right intersection. If the model is the subject, then her face would be the most important part and that is what you need to position on where the imaginary lines intersect.

Here is how the final image looks like:


For starters, this may seem odd and you may be more inclined to put your subject dead-center. Don't. Just practice making pictures by taking into consideration the rule of thirds and you'll soon notice it will become second nature.

What do you think? Use the comments option to share to us what you think, what you want to ask, or if you have something of yours you want to add.

Sunday, September 27, 2009

Side Trip

Let's take a breather from photography for just a few moments. For Cebu readers, you may want to take a look at the Cebu Business Directory. The website is a database of contact numbers for Cebu from Cebu hotels, Cebu resorts, Cebu shops, and etc. If you're looking for a business or establishment contact number, try to visit the site first and do a simple search.

Check out the links below to access the site:

Parkmall Dogshow

So, I to the Parkmall to relax, do a little shopping, and for coffee. When, I found out there was a dog show. Good thing I brought my camera with me. It was an overcast day and so I had to shoot at 400 and even 800 ISO so I could maintain a faster shutter speed. Here are a couple of the shots that I took.


parkmall dog show

parkmall dog show

parkmall dog show

Retouching In Photoshop

Many years ago we would have not thought of this. But now, I personally believe that all pictures you see in magazines are edited. At least, portraits of our favorite "stars". Yet, I still see some local photographers that, when asked, would disprove that they edited the picture. Sometimes to a point of being unbelievable. I personally do edit my photos. I'm not yet an expert so, at the moment, I do minimal edits.

Here's a video I found on the internet about this topic.


Wednesday, September 16, 2009

Fort San Pedro Photoshoot With Kirstie

This is actually the first photoshoot that I did with the model Kirstie Babor. She was kind enough to lend me her talent and, of course, her beauty. I decided to do the shoot at the Fort San Pedro here in Cebu. It was quite unlucky because when we arrived, there were 3 buses parked outside filled with Korean tourists. What a coincidence! I had to be very careful with the shots as not to include people/clutter in the background. Well, here are the results.


Exposure: 0.006 sec (1/160)
Aperture: f/5.0
Focal Length: 100 mm


Exposure: 0.02 sec (1/50)
Aperture: f/8.0
Focal Length: 154 mm


What do you think? Please share to us your comments.

ISO Speed

As was discussed in previous articles; exposure is controlled by the shutter speed, aperture, and ISO speed.  I've already discussed the basics of shutter speed and the aperture.  In this article, I will be discussing what the ISO speed is and how to use it when trying to expose your image.

For digital cameras, the ISO speed equivalent indicates the sensitivity of the image sensor to light.  By increasing the ISO speed, you increase the sensitivity of the image sensor.  This will allow you to shoot at low-light while maintaining a high/higher shutter speed.  However, this doesn't come without a cost.  By increasing the ISO speed, you also increase the amount of digital noise in an image.  The good thing is that most newer cameras, especially full-frame DSLRs, handle high ISO noise very well.  This means that you can increase your ISO speed to 800 or 1600 and the image would still be usable.  On my camera, there is an option to turn on the HIGH ISO SPEED NOISE REDUCTION.  I'm sure other current DSLRs also have this feature.  Try to turn it on and notice a reduction in image noise.

Here's what you can try:
  1. Set for the lowest ISO to minimize noise.  Set your camera to ISO 100.
  2. Be creative by controlling the Depth Of Field (DOF). Set your camera to aperture priority (Av for Canon). This will allow you to control the DOF to create creative shots.
  3. Meter. Try to meter (pressing the shutter button half way) a shot and you're camera should display the shutter speed it selected to get a proper exposure.  Also consider the focal length of the lens you are using; a rule of thumb is that the shutter speed should not be lower than 1 / (focal length).  Meaning, if you're using a 50mm lens, you should not go lower than 1/50" (or 1/60") shutter speed. Another thing to consider is also whether the subject is moving.
  4. Adjust. If the shutter speed is too low for you to be able to compose a shot properly (e.g. lower than 1/(focal length) or if it is too slow for your moving target), you can then increase your ISO speed to the next setting which is ISO 200.
  5. Repeat. Compose the shot again, check the shutter speed selected by your cam, and increase the ISO speed again until you're contented with the shutter speed selected by your camera.
Now, go out and practice shooting with your camera using those steps.

Tuesday, September 15, 2009

How to Be Photogenic

You've already known the basics of exposure. But how do you shoot an appealing portrait? Here is an article on how to be photogenic in a shoot. This is designed to be read by the subject but is also a good read for us photographers. You can apply these same principles to your subjects when shooting them.

from wikiHow - The How to Manual That You Can Edit

Do you dislike having your picture taken because you always seem to come out looking hideous? Felt jealous of your friend who always comes out flawless in photos? What’s the deal with pictures? While being photogenic just comes naturally to some people, there are a few things that anyone can do to look better in photos. Try out the tricks in this article and stop running for cover whenever the camera comes out.

Steps

  1. Wear clothes with colors that suit you. Certain colors complement certain skin tones, while others tend to bring out the worst. Also take into consideration your hair color. You may have a feel for which colors you look best in, but if not, do some research (check out the external links below) and some trial-and-error.
  2. Pick the right clothes. As in, don't overdo it. Wearing a blue shirt and blue jeans might make you appear to blend, which is not good. Try not to wear too much pattern either, or it will take attention away from your gorgeous face.
  3. Hide your blemishes. The bad thing about photographs is that because they are simply frozen images of one angle in an instant in time, they can't show all your good attributes. The good thing about them is that you can easily hide certain features you don’t like.
  4. Determine your best angle. Beyond the obvious hiding of blemishes, finding the right angle for your face can be a bit more difficult. The best thing you can do is experiment using a digital camera so that you can immediately see the results of each pose. It will very quickly become obvious which angles are most flattering for you, and you can then use that angle as much as possible in the future. The classic model's pose is to arrange your body 3/4 toward the camera with one foot in front of the other and one shoulder closer to the camera than the other. This isn’t the best pose for everybody, however, and it can look a little ridiculous when used in a family photo right next to your Uncle Wilber.
  5. Get rid of a double chin. Tilt your head up slightly and try to position yourself so that the camera is a little above your eye level. This will hide a double chin fairly effectively. You can also put one hand under your chin as though you’re resting your head on your hand (keep the thumb side of your hand out of the camera’s view, if possible). Don't actually rest any weight on the hand, however, or you will push the skin into an unflattering position. Also try resting your tongue against the roof of your mouth.
  6. Stick your neck out. One trick models often use is to present a 3/4 pose to the camera (turn your head so that 3/4 of your face is exposed to the camera, as opposed to a full frontal shot) and then lift your neck and slightly tilt your head down, as though you are a turkey sticking its head out (without actually thrusting your chin out). This improves facial definition and helps ameliorate wrinkles and flabby skin.
  7. Relax. Many people end up looking odd in photos because they freeze into odd facial expressions with a “say cheese" type of smile on their face. If you're used to having bad pictures taken of yourself, you probably get nervous in front of the camera, and this can make things even worse. If you know a picture is about to be taken, take a deep breath and exhale naturally, relaxing your arms and shoulders. As you exhale, smile or strike whatever pose is appropriate. Don't hold your breath, either in or out, otherwise you'll appear as though you're tense or suffocating. If you see the photo coming too late, don’t panic and try to strike a pose. Keep doing what you're doing and try to ignore the camera. It may not turn out perfectly, but you’ve got a better chance than if the camera catches you quickly trying to change your facial expression. The more comfortable and relaxed you appear, the better the photo will turn out.
  8. Think happy thoughts. An unnatural, forced smile can make you look stiff and, frankly, weird. When people are smiling and waiting for a photo to be snapped, their facial muscles can get caught in all sorts of strange positions. To remedy this, try to time your smile so that you don't have to hold it for too long. Also, imagine something really funny (don't be afraid to laugh a bit, even) or think of someone—your spouse or child, for example—who makes you happy. By doing so, you’ll get a genuine smile. If you don't like your smile or your teeth, try a more subdued, closed- or partially-closed-mouth smile. Regardless of how you choose to smile, the happier and more relaxed you are, the better.
  9. Smile with your eyes. Nothing projects happiness and beauty like smiling eyes: a happy, somewhat mischievous expression of the eyes. To achieve this effect, imagine that the camera is a person you have a crush on walking into the room. This will create wider open eyes and a relaxed smile. Chances are you unconsciously do this all the time; the trick is to be able to bring it out on demand, so practice the smiling eyes in front of a mirror.
  10. Maintain your posture. Listen to your mother — remember how she always told you not to slouch? Good posture can dramatically improve your appearance in pictures. Sitting or standing up straight will make you look healthier and more alert and, if in a group setting, more attractive than your slouching companions. Just remember to breathe normally and relax your shoulders. Especially if you usually have bad posture, it may be difficult to stand up straight and not look stiff, so practice this in the mirror.
  11. Get a better photographer. Professional photographers generally know how to bring out the beauty in people. You can't always choose your photographer, but sometimes you can. If you need headshots for modeling, get the best professional you can find. If you're going to put up a shot for an online dating service, choose a photo that is recent, that flatters you, but most importantly choose a photo that actually looks like it is you. There is no point in advertising an airbrushed goddess direct from the catwalk if this is not a true reflection of yourself.
  12. Edit or enhance photos. If you've tried everything, but you still can’t seem to get a good picture of yourself in any environment, try slightly altering your digital photos. Changing the lighting effects or filter effects, for example, can dramatically improve the appearance of your complexion.
  13. Fake it till you make it. People are often photogenic because they like having their picture taken. They are therefore relaxed and happy when the camera appears. If you cannot muster up genuine love of the camera, pretend you like the camera. Imagine the camera is someone you love, a long lost friend, an old flame, your child at age three, or whatever you need to look at the camera lovingly. Try it—it really does work.
  14. Keep the shine down. It is so important to keep the shine down in the ever-troublesome t-zone - the top of your nose and your forehead. Especially on a warm day but even the coolest among us may get a little sweaty when faced with the lens of a camera.
  15. Relax your lip(mouth) region and don't have any delirious thoughts filled with gloom. It's a natural way to appear fresh and appealing in photographs.
  16. Keep your face in equilibrium Look at your face in the mirror. That's NOT actually the face which comes in your photograph. Now stare at your own reflection. After some time your face will reach the 'normal' condition. That will be your 'equilibrium' face. Now deactivate your eye region and activate your lip region. Don't clench your teeth, just make sure that your upper and lower jaw molars touch each other. Always smile if your complexion is dark or dull and your smile should be a slight one. At the same time stress the corners of your eyes and raise your eye brows a little. Practice this exercise every day before mirror for a few minutes. In one month it will become a habit whenever someone tries to take a photograph of you. But don't forget the most fundamental things for a good photograph and those are good cheer and confidence.
  17. Shoot in the shade. When you're shooting outdoors where the sun is shining, try to find a shade and shoot from there. This will give you a good diffused light and will also prevent the you from squinting.

    If you can't find any shade, or if finding one would prove impractical, you can also use a white cloth to cover the sunlight from hitting the you directly. You will have a good diffused light, and again, will prevent you from squinting.

Warnings

  • Make sure your photos look like you. These steps can help you better capture your natural beauty in pictures, but if you end up doctoring your photos too much you’re liable to look like someone you’re not. While you want to put your best face forward for online dating sites or acting headshots, you also want to make sure you accurately represent yourself. If you don’t, dates and potential employers may feel deceived.
  • Sucking in your stomach will make you appear unattractive because your ribs may poke through your shirt. Worse, it will make you look slightly uncomfortable, which is never appealing.
  • Tilting your head down slightly can sometimes create the effect of a double-chin, rather than hiding one.
  • Men: wearing make-up may be socially difficult at first. Practice at home in private to get comfortable before any photos are taken.
Article provided by wikiHow, a wiki how-to manual. Please edit this article and find author credits at the original wikiHow article on How to Be Photogenic. All content on wikiHow can be shared under a Creative Commons license.

Interaction

I've already added a few articles that I think would be helpful for other beginners like me. I hope you like the articles and find it helpful. There may be some things that you would like to know about but I have not published. If you have a question, or if you want an article that is not yet here, feel free to send me an email. I'll try my best to create one for you if I can.
Also, if you have something in mind; an article perhaps. You can also send that to me via email. The article will be posted and you will be recognized as the author. We can also provide a link to your own website or blog within your article.
For comments, suggestions, or if you'd like to submit your own article, email me at palmtechguy-1@yahoo.com.

Tuesday, September 1, 2009

Shutter Speed

In a previous article, we discussed how the aperture controls the exposure of an image.  Again, exposure is basically controlled by 3 factors, that is the shutter speed, aperture, and the ISO.  In this article, I'll discuss how the shutter speed affects exposure and when to use which shutter speeds.  I'll also discuss creative uses like panning (this will be discussed in more detail in a different article) and also light streaks.


The shutter speed indicates the amount of time that the shutter remains open.  When closed, the shutter covers the image sensor prohibiting light to enter.  Shutter speed is expressed in seconds or fractions of a second (e.g. 1/60, 1/80, 1/100, 1/125, ..., 1/500, ...).  The greater the denominator the faster the shutter speed.  You normally use fast shutter speeds for moving subjects (as in sports photography) to freeze the action.  Alternatively, for portrait photography, you can go as low as 1/60 without risk of motion blur.  As you go lower, you increase the chance of getting a blurred picture due to camera shake; this is something you generally would like to avoid.  


The rule of thumb is you'd want the shutter speed not slower than 1 / (focal length) when shooting hand held.  This means that if you are using a 50mm lens or if your zoom lens is set to 50mm you will need to set your shutter speed to at least 1/50 (or 1/60).  This is to avoid blurred photos due to camera shake.  Some lenses equipped with IS (Image Stabilizer - Canon) or VR (Vibration Reduction - Nikon) will allow you to set the shutter speed, theoretically, 3 to 4 stops lower than this desired setting.  However, this does not prevent blurred photos due to subject movement.  If you have already opened up your aperture but the required shutter speed is still slow, you can increase your ISO setting until you get the desired shutter speed.  There is also an option to use flash.  There's no defined shutter speed you need to use.  When shooting, you need to consider whether your subject is moving (and the speed that the subject is moving) or if your subject is posed or standing still.  You'll need to use faster shutter speeds if the subject is moving.    


An example of falling water shot at a slower shutter speed.


A long exposure shot at the Plantation Bay Resort


Panning
 

Generally, you'd want the fastest shutter speed possible.  However, there are instances that you'd want a slower shutter speed to show movement.  When you shoot a moving object (e.g. car, a person riding a bicycle) using a fast shutter speed, the subject will seem as if it is post or standing still.  When you want to show movement, you'd be using a slower shutter speed.  The technique is to pan the camera while pressing the shutter button half way and making sure that the subject is in the center of the frame.  You'll also need to set your auto focus (AF) to AI-Servo so that the camera will try to get the focus in real time while your subject is moving.  By doing this, the subject will remain in focus while the background will become a blur.  This is a good technique which will show subject movement.  A good technique is to start following the subject even before it reaches the area where you want to shoot; meaning, hold down that shutter button half way and track the target ahead of time.  You then need to follow your subject, press the shutter button fully when you have the composition you like, and continue to pan even after the shutter button is pressed.


Light streaks


Have you ever seen those shots where you just see light streaks on the streets while other objects like street lamps are still in focus?  These types of shots are done with a longer exposure (e.g. 1 second or longer).  In some cases, you can even use the BULB mode.  The bulb mode is when the shutter remains open for as long as the shutter button is pressed.  In this type of shot, you will need to mount the camera on a tripod.  Never try this shot hand held.  You can try to support your camera on a camera bag or a bean bag but a sturdy tripod is the best.  Also, make sure not to push the shutter button to take the shot.  Either use the timer function or use a remote control.  This is because, at slow shutter speeds, tiny camera movement will almost always ruin the shot for you.  I'd suggest using ISO 100 (for the least amount of digital noise).  You can give this a try, set your camera to Aperture priority (Av for Canon), set the ISO 100, set your aperture depending on the depth of field you want to capture (e.g. f/11), set the timer to 2 seconds, compose, and then take the shot.  I suggest using this method for beginners before using full manual.  You can then just memorize the settings that the camera gave you, set your camera to manual mode, and then play with different shutter speeds and see what happens.  Also note that some cameras have a feature to allow noise reduction on long exposures.  Try to check if your camera has this and try turning it on.